
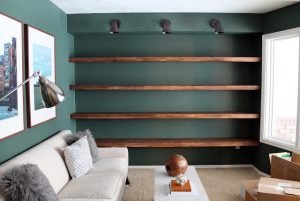
Floating Shelves Project
DIY Solid Wood Wall-To-Wall Shelves
Floating Shelves Project
We really wanted wall-to-wall thicker solid wood shelves that maybe looked like they were floating, but not necessarily are–since you can’t very easily achieve that with solid wood. We are so pleased with the results! Of course, now we can fill them up with books and some accessories, but before we do that we wanted to give you a full breakdown of what we used and what we did in case you wanted to do something similar in your home. And why wouldn’t you!?
What We Used
What We Did
We special ordered the boards because we wanted them a little thicker, and we wanted squared edges. We were pleasantly surprised at how inexpensive they were. Even still, the ends were a little rough and uneven, which we expected, so the first step was to square the edges and cut them to fit on the wall exactly. For this, we used a miter saw. The blade wasn’t big enough to cut through the whole board (wah wahhh), so Chris cut half, flipped the board, lined up the blade with the first cut, and finished cutting through.
Even though we wanted the shelves to look like they were floating (ie, no visible brackets), we knew that would be difficult to achieve with the size of boards we were dealing with. The boards were really heavy. So we picked up these 2 inch metal angle brackets. These worked perfect, because they were short enough to hide behind the 2.5 inch boards, but strong enough to hold the weight without bending. Something this short wouldn’t work if just holding from the back wall, but since we were putting the shelves wall-to-wall, we could have one bracket on each end to prevent the boards from sagging forward.
So after cutting the boards to size, we measured the wall and found 3 somewhat evenly-spaced studs that we could connect the brackets straight into. Unfortunately, there weren’t any studs where we needed them to be on the sides, so we found some heavy-duty wall anchors, each rated to hold up to 75 pounds. We would have two anchors supporting each side bracket (a total of 4 anchors in the 2 side brackets for each board), and coupled with the back-wall brackets mounted directly to the studs, this would give us plenty of support.
After taking the measurements and deciding where the brackets would mount on the back wall, we marked these locations on our boards and routed spaces out so the brackets could set inside the boards, making them flush and less visible. You need to take the measuring part of this step serious, because the brackets are hung on the wall before you place the shelves. This means your routed out spaces need to match perfectly with where the brackets are mounted. We’ve all heard the advice to “measure twice, cut once.” Well with this, measure 5 or 6 times, pray like mad, and then cut.
continue reading


